
Full Video Review
Want to quickly check the full video review of Synology DS112j? Here you go, have a look! But we'd recommend reading through the complete review to understand everything about this wonderful NAS device.
We'd like to express our sincere thanks to Digit, that is www.thinkdigit.com for sending us the DS112j for review. It was pleasure to review this device, which would have otherwise been impossible without the support of ThinkDigit (9.9 Media). Also, thanks to Synology for making this (and many more) NAS devices.
We'd like to express our sincere thanks to Digit, that is www.thinkdigit.com for sending us the DS112j for review. It was pleasure to review this device, which would have otherwise been impossible without the support of ThinkDigit (9.9 Media). Also, thanks to Synology for making this (and many more) NAS devices.
Introduction
Sharing documents and multimedia has become a crucial
aspect of any gadget these days. With more and more devices supporting advanced
technologies like DLNA and media server, it’s becoming easier to centralize all
your content instead of taking the hassle of duplicating it on all gadgets that
you own.
To add to this ease of sharing, and to take it much
beyond that, the world-renowned expert in network-attached storage devices –
Synology has brought us an efficient, robust, feature-packed and yet economical
solution – The Synology DiskStation DS112j.
Synology DS112j has been designed with the perception of
a ‘new-NAS experience’, and it exceeds all expectations when it comes to that.
Not just a network-attached file server, this packs in a whole lot of new
features such as personal cloud, file sync, multimedia streaming, compatibility
with smartphones, and USB ports for infinite possibilities. Keeping the needs
of home and small office customers in mind, this has been designed to be a very
power-efficient and noiseless (probably the quietest ever) NAS device. All this
comes at a very economical pricing, which doesn’t put any significant load on
your pocket if you’d like to buy one (or more) of these.

With extraordinary hardware configuration, balancing both
processing power and power consumption, the DS112j is lightweight and has small
form-factor. With easily replaceable 1xHDD bay supporting up to 4TB of storage,
it basically fulfills the requirements of a home or small office user. However,
if you need more than 1 bay for some reason, DS112j is not for you. But hey,
Synology has whole lot of DiskStation NAS devices, with various configurations
for different customer needs. Finally, DS112j proves to be the best NAS in its
segment in almost every criterion.


Unboxing and Installation

 Most gadgets come pre-installed right out of the box. The
Synology DS112j is in a way an exception. While it does not expect any kind of
technological expertise to assemble a product, it gives a nice do-it-yourself
hardware and software installation experience. Most of the required hardware is
assembled, you only need to slide the hard disk into the right place and fix
some screws, which isn’t a difficult job to do.
Most gadgets come pre-installed right out of the box. The
Synology DS112j is in a way an exception. While it does not expect any kind of
technological expertise to assemble a product, it gives a nice do-it-yourself
hardware and software installation experience. Most of the required hardware is
assembled, you only need to slide the hard disk into the right place and fix
some screws, which isn’t a difficult job to do.Unboxing the DS112j makes you feel how lightweight the device basically is, when the hard disk drive is not installed. The box gives a lot of information about the product itself. The package contains 1 each of a DS112j main unit, installation disk, assembling kit, power cord, power adapter and RJ-45 LAN cable, as shown in the photographs. The unboxing video gives a feel of taking each of these contents out, while the installation video intends to show the hardware installation. Its then pretty evident how easy it is to install the Synology DS112j. It takes about 10 minutes to perform the hardware assembly (assuming you don’t know anything) and about 15 more minutes to install the software. The software setup may take any duration depending upon the customizations you want to install. But the basic installation is a matter of 25-30 minutes, including the power connections and getting it wired into your LAN network.
HARDWARE INSTALLATION

SOFTWARE INSTALLATION

 Installing software is basically formatting the HDD for
the first time, and installing the latest DSM on it. The installation disk
provided in the package contains the necessary tools to perform this task quite
easily. Within a few clicks as shown in the pictures, you can get it
up-and-running with the DSM version provided with the installation CD. If you
want to use the latest DSM with the most recent patches and features, you might
need to download it from Synology website. Depending upon your internet
connection speed, this may take a few minutes. After you’re done installing,
you may login to the main user interface – called as the DiskStation Manager
(DSM). A welcome screen helps you get acquainted with most of the features
which we’ll cover in the features part of this review coming up next.
Installing software is basically formatting the HDD for
the first time, and installing the latest DSM on it. The installation disk
provided in the package contains the necessary tools to perform this task quite
easily. Within a few clicks as shown in the pictures, you can get it
up-and-running with the DSM version provided with the installation CD. If you
want to use the latest DSM with the most recent patches and features, you might
need to download it from Synology website. Depending upon your internet
connection speed, this may take a few minutes. After you’re done installing,
you may login to the main user interface – called as the DiskStation Manager
(DSM). A welcome screen helps you get acquainted with most of the features
which we’ll cover in the features part of this review coming up next.
That’s most of the things you’d need to do in order to
get your Synology DiskStation DS112j up-and-running at your home or office
easily. Should you need any assistance, you can refer to the help, online
guides, official Synology forums or ThinkDigit forums.
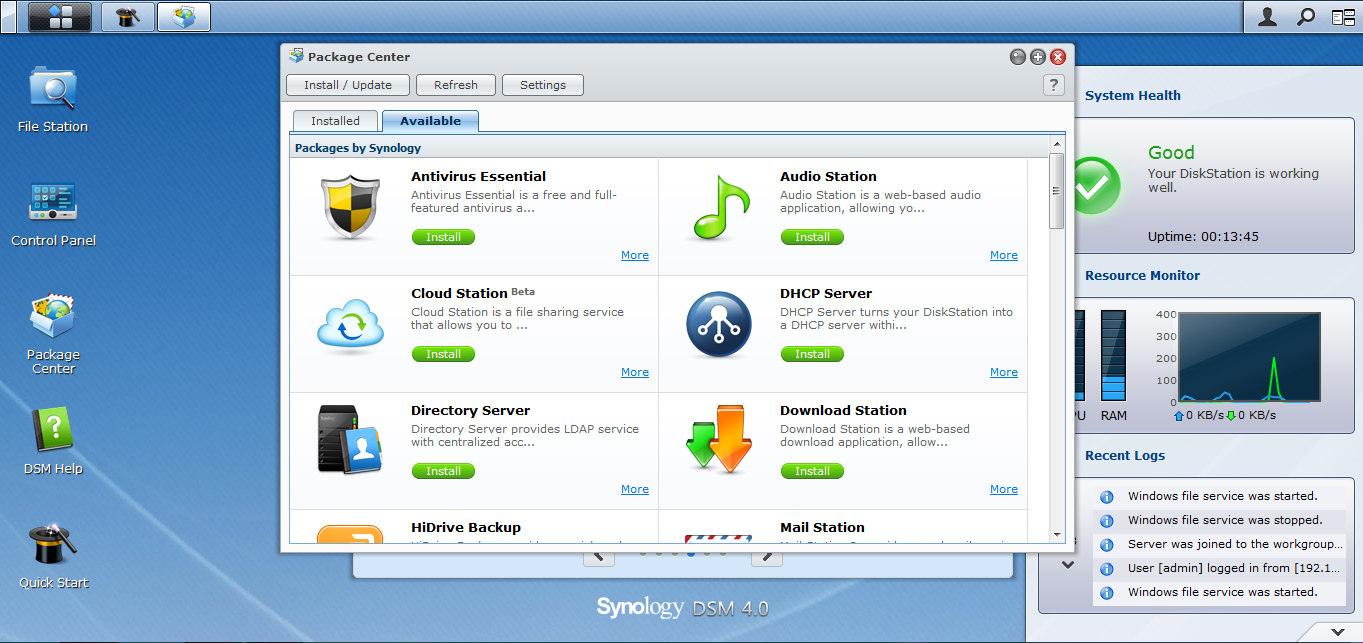
Package Center

Next part of any installation is customization. The
Package Center is an important aspect of the DS112j like any other Synology
DiskStation NAS. It allows you to install desired packages available for your
device, either developed by Synology or any 3rd-party developer for
virtually infinite possibilities. These applications (called ‘packages’) have
been tested and updated on a regular basis to provide maximum stability in
applications. Some of the packages are actually essential elements of Synology
NAS to make the most out of it, while some are purely optional based on usage
scenarios and personal likings. For example, Audio Station is a package
downloadable from the package center, but it is very important to install this
package to make the most out of your device in terms of playing music. However,
one might not want to install WordPress package on this NAS, if he’s not
willing to host a wordpress blog. Similarly, many applications are optional as
well as essential in terms of their usability and purpose.
Hardware Features
Synology
DiskStation DS112j has a number of distinct hardware features which makes it a
truly wonderful NAS device, including look and feel, hardware compatibility as
well as cool and quiet design.
LOOK AND FEEL

Look and feel of the Synology NAS device is more of a
mini-server or workstation than a hard disk. It resembles a typical HTPC (Media
Center PC) in terms of form factor, size and looks. The white color body
integrates perfectly with any surrounding devices, and still stands out from the
others.
All connections are given on the rear side of the device, such that you can place it without any entanglement of wires on your table or desk. On the left as well as right, the brand name “Synology”, crafted into ventilation holes, catches the eye, while it serves as a ventilation channel on both the sides, useful for air flow and heat dissipation.


On the front, it has LED indicators as shown in the picture which give you direct information about how your NAS is running. The Status LED marks what state the device is working in, similarly LAN and Disk LEDs give relevant information for diagnostic purposes.
On the bottom, the DS112j has an information sticker, with an open-close label for easy installation. The bottom is rested on the desk with the help of four rubber stands, which reduces vibrations caused by the HDD in operation. This is particularly useful when you’re keeping it on the same desk which you work on.

SIZE COMPARISON
DS112j comes in a medium-sized form-factor. It is neither small enough to be carried around, nor too large to be bulky. Its certainly smaller than our HTPC, the media center PC we sometimes use, but bigger than a Seagate BlackArmor NAS of the same drive capacity. The medium-sized form factor is a balance between space management and cooling system. When we see the interiors of a Synology DS112j (during installation), it is pretty evident that there is a lot of empty space inside the main cabinet. Also, it includes a fan, making the box a little bigger. The empty space is important to circulate the right amount of air through the main unit, to keep it cool and quiet. We had previously experienced problems with the Seagate Blackarmor NAS because of its tightly-fit cabinet around the hard-disk drive, which used to heat up quite often and sometimes reboot. Also, it doesn't provide as many features as the DS112j, hence it requires smaller circuits.
Since a NAS device doesn't require as much circuitry as a media center PC, the DS112j is obviously smaller than a Mini-ITX cabinet HTPC, hence occupying lesser space on our working desk. The size comparison of the HTPC, Synology DS112j and Seagate Blackarmor NAS can be seen in the pictures.


HARDWARE COMPATIBILITY
Combining the sleek and fresh design with great hardware
compatibility makes this device truly useful. On the rear, it has a power
inlet, two USB 2.0 ports and a RJ-45 LAN port. The two USB ports enable you to
plug two devices at the same time, making multi-tasking possible. For example,
we printed some photos off an external HDD by connecting both, the printer as
well as the external HDD in the Synology NAS at the same time. This reduced the
hassle of copying the photos over to Synology’s internal HDD first and then
printing it, and allows to keep important USB devices (such as shared printers)
running all the time.


It is not just pen drives, external HDDs and printers
that you can plug into this NAS box. It can accommodate a wide array of USB
devices to its USB ports. This includes USB-DVB sticks to record media directly,
a 3G dongle for easy internet access (not tested), mobile phones, card readers
and many more general USB peripherals. It however cannot support any input
devices such as a keyboard or a mouse, which can still be connected safely,
although they won’t be of any use.
COOL, QUIET AND LOW POWER CONSUMPTION
Synology DS112j comes with efficient airflow tuning. It
creates a direct and non-stop airflow channel right through the device, which
improves ventilation multifold than having a closed box unit. It not only
provides cool airflow, but also reduces the natural humming generated by NAS
itself. DS112j’s noise levels are so low that you cannot hear it even from a
distance of about 1 ft. It is only when you put your ear next to the NAS box,
you hear the HDD spinning and the fan doing its job to keep the system cool.

Very low power consumption makes DS112j economic in terms
of continuous operability by not impacting your electricity bills too much. The
low-noise design further enables you to keep the NAS device anywhere without
getting irritated. For example, our device sits right onto the desk where we
work.
Software Features
Older NAS devices usually come with only the basic
software features – file sharing, backup and maybe a basic multimedia server
thrown in. Synology DS112j exceeds any of your expectations from a NAS device.
It not only has the most advanced features, but also many things which NAS
devices traditionally don’t have, or haven’t been imagined to have. This truly
justifies the tagline carried by all new Synology DiskStation devices – The
“New NAS experience”. Technically speaking, it has the highest number of unique
features available amongst any other network-attached storage device. Newest
updates to DSM, makes it possible to have virtually any number of features in
the future.
It is impossible to discuss each and every feature of
DS112j (yes, there are so many!), however we’ve done our best to compile and
display the key features which makes DS112j stand out from its competitors
(we’d say there is no competition to it as such!).
DISKSTATION MANAGER UI
Synology DiskStation comes with Synology’s own DSM user interface, which combines the best of compatibility and functions in order to
create the most efficient UI on any NAS we’ve tested. Running in any standard
web browser, DSM user interface has it all – ease of use, simplicity,
capability of multitasking and loads of customization. With the help of
probably the best-written help topics built into DSM, absolutely anyone can
make most out of their DiskStation. Installable packages by Synology as well as
3rd-party developers take this to a great new level of
customizability and features. Consistent updates of DSM released by Synology
ensure compatibility, security and stability across all Synology NAS devices,
including the DS112j.
EASY NETWORK SETUP

Synology ezCloud service helps you to build a seamless Internet
presence for DiskStation. ezCloud offers “QuickConnect” to sets up direct
connection for users without worrying about port-forwarding. There’s no need to
configure a router or any other device. No more hassles from seeking 3 party
services makes the network setup a smooth experience.
For a complete network setup, EZ-Internet also provides
step-by-step instructions for connections, DDNS registration, and firewall
settings. Port-forwarding is done almost automatically to provide you with the
easiest network setup ever. DiskStation is also enabled to automatically discover
UPnP routers within the network so you really don’t have to worry about
complicated network setup anymore.
PERSONAL CLOUD
Effortless file synchronization and seamless sharing
marks its one of the important features. Storage management in a central hub
makes it easy to manage your device from any of your workstations. File Station serves as a file center
and makes the file navigation as the native experience as what a PC or Mac
could offer. Users can also assign privilege settings for their files.
Cloud Station takes file synchronization to a new level. It
automatically syncs files with any edit and pushes the changes to every PC
computer at hand. Files stored within cloud will always be up-to-date and ready
for offline viewing and edits. This automates most basic tasks, and could also
be used for backup purposes, however that is taken care of by many other
packages based on your need.
Users can fully
customize their DSM desktop by adding application shortcuts and changing
the background wallpaper. Administrators can enable different packages to be
used by the users and they can also change the design of the login page. Each
user gets a private folder to store their files in conventional folders as on
any PC or Mac. They can even have their own online photo album with the
flexibility to design it the way they want. That means – every user can have a
separate photo album, while the photos are stored in the cloud on the DS112j.
Instead of using cloud station to make backups, it is
possible to have various backup
solutions integrated in the device. Files that are originated from Windows
can be backed up onto DS112j by any 3rd party software, or Data
Replicator 3, which is developed by Synology. Mac users can use the DS112j as
their backup destination for time machine backups without worrying about any
compatibility issue. Manual and automated backup scheduling makes it the
easiest and best backup solution for any backup purposes. Be it your photos or
important office presentations, the DS112j will take care of them for you, so
that you’d never miss a routine backup schedule.
RICH MULTIMEDIA CAPABILITIES
Synology NAS are known to provide the best digital
entertainment, and the DS112j isn’t an exception. It serves as the center to
offer a plenty of multimedia apps to expand the entertainment horizon.
Audio Station is the embedded music player for music streaming and
Internet radio. Each user can have their own personal music library and create smart
playlists based on their favorites. Audio Station can be accessed directly from
the browser window, in the same window as DSM, providing the best music experience
using the multitasking-capable DSM UI. This eliminates the need to have a
compatible music player on all your workstations. Just a javascript-capable
browser can enable you to listen to your favorite music from any PC or Mac.
However, if you’re more used to iTunes, music stored on DiskStation can also be
directly streamed to your iTunes player.
Isn’t it great to create your own online photo gallery and
blog without capacity limits? DS112j lets you do just that, using the Photo Station. This built-in app
enables you to display the photos uploaded in order with a Timeline and
locations pinned on Google Maps. You could geo-tag a vacation to Kashmir or tag
family and friends in this weekend’s party photos with automatic facial
recognition. Also, photos can be synchronized onto Facebook and Picasa Web Albums
or shared on Twitter, which makes it a truly social photo album solution.
Video Station is your personal theater, using which you can browse and
organize all videos and movies at your fingertips. With a USB DVB stick plugged
in, TV shows can be live streamed onto computers or set recording schedule
directly via Video Station. Media Server
is capable of streaming digital contents from DiskStation to other multimedia
devices, for instance, the DLNA/UPnP compatible TV sets. Having a Sony
PlayStation 3 or a Microsoft Xbox 360? You can use them to stream personal
media to a larger screen for better entertainment. DS112j also supports streaming
with AirPlay devices for you, if you’re a dedicated Apple user.
All multimedia is also accessible on-the-go. Synology’s mobile apps, DS audio, DS
photo+, and DS video let users to manage and enjoy all the digital contents
directly on mobile devices. A video explaining some of them in brief will enable
you to know how Synology has made all our devices have terabytes of storage
using all the above multimedia applications and personal cloud. DSM mobile
offers complete touch-screen experience to monitor and manage DiskStation, such
as account and privilege settings and quick access to mobile applications. All
mobile apps are designed differently in looks on iPad, iPhone, and Android
devices. This enables you to use them in an environment you’re most used to.
Performance

We’ve performed a couple of important tests for measuring
the performance of the Synology DS112j, which are Read/Write speeds and
multimedia streaming test using PS3. Both these tests were taken with the following test
setup.
TEST SETUP
We used a few devices we have in
order to test the performance of this NAS. The purpose of using comparatively
high-end configurations was to eliminate any external limitations and factors
which could affect the performance of Synology DS112j. However, we could only
use the ones available readily with us.
1) Dell XPS L502X Laptop – Intel Core i5-2450M @ 2.50GHz
2.50GHz / 8GB RAM / 64-bit Windows 7 Home Premium (OEM) / 750GB 7200RPM HDD /
Power plugged-in / Connected optionally by LAN and Wi-Fi to test read/write
speeds and streaming
2) Sony PlayStation 3 slim / 120GB model / Connected LAN via
Wi-Fi to test streaming
3) Seagate FreeAgent|Desk External powered HDD / 1TB / USB
2.0 interface
4) SanDisk 8GB Flash disk drive
5) Belkin Router-Modem and D-Link 10/100 Ethernet switch
READ/WRITE SPEEDS TEST
We conducted this test in many phases. Results of each
phase have been compiled into the screenshot given below. All testing was done
with laptop connected to LAN using RJ-45 cable and an Ethernet switch. For example, we tested copy speeds from
PC to NAS, from NAS to PC, from USB to NAS etc. However, this should not be
taken as official data since many factors can affect the tests conducted by us.
Our tests proved that the Synology DS112j is indeed very
fast in terms of general usability. However, we faced some performance
degradation over Wi-Fi connection between our laptop and the modem. Hence, we
switched to testing over LAN RJ-45 interface most of the time.
The tests shown in screenshot below are -
Top L: NAS to PC; Top R: PC to NAS; Bottom L: USB to NAS; Bottom R: NAS to USB.
The tests shown in screenshot below are -
Top L: NAS to PC; Top R: PC to NAS; Bottom L: USB to NAS; Bottom R: NAS to USB.
MULTIMEDIA STREAMING TEST
The video below describes the multimedia streaming test
performed using the test setup mentioned above. The video in .mp4 format (x264,
720p, AAC audio) was stored on the NAS which was streamed to a PlayStation 3
device over Wi-Fi.
Applications
It is the applications packages which makes the DS112j a
truly different and new NAS experience. Various applications such as Photo
Station, Audio Station, Storage manager, Download Station etc. can be used to
enrich your NAS experience customized to your needs. Some specific noteworthy
applications have been explained in this section. The video below shows briefly
all the noteworthy applications.
PHOTO STATION
Photo Station, a built-in app
enables you to display the photos uploaded in order with a Timeline and locations
pinned on Google Maps. You could geo-tag a vacation to Kashmir or tag family
and friends in this weekend’s party photos with automatic facial recognition.
Also, photos can be synchronized onto Facebook and Picasa Web Albums or shared
on Twitter, which makes it a truly social photo album solution.

AUDIO STATION
Audio Station is the embedded music player for music
streaming and Internet radio. Each user can have their own personal music
library and create smart playlists based on their favorites. Audio Station can
be accessed directly from the browser window, in the same window as DSM,
providing the best music experience using the multitasking-capable DSM UI. This
eliminates the need to have a compatible music player on all your workstations.
Just a javascript-capable browser can enable you to listen to your favorite
music from any PC or Mac. However, if you’re more used to iTunes, music stored
on DiskStation can also be directly streamed to your iTunes player.
Update!! Audio Player gets a overhaul in DSM 4.1. We just updated our DSM, to find a complete new look for the audio station UI, and a nice mini player too. Check it out in the screenshot below:


Update!! Audio Player gets a overhaul in DSM 4.1. We just updated our DSM, to find a complete new look for the audio station UI, and a nice mini player too. Check it out in the screenshot below:


DOWNLOAD STATION
 Download Station is a centralized place to manage all
your downloads on the Synology NAS. Forget about keeping your PC running whole
night just because it was downloading something. Just use download station to
download files directly to your NAS. It’s very easy to configure and start
downloading in seconds after installing this optional package from the package
center.
Download Station is a centralized place to manage all
your downloads on the Synology NAS. Forget about keeping your PC running whole
night just because it was downloading something. Just use download station to
download files directly to your NAS. It’s very easy to configure and start
downloading in seconds after installing this optional package from the package
center.CLOUD STATION
Sharing files and photos with family and friends has
never been easier than with this application. Network drive is the fastest method
to access files at home. For access over the Internet, you can use the file
browser to manage and transfer files by simply dragging and dropping, on
Windows and Mac. iPhone, iPad, and Android phones can also access DS112j cloud
in similar way. All user interfaces are thoughtfully designed keeping in mind
the usability to a specific user. In short, even those who aren’t familiar with
PC will discover the user-friendliness in DS112j for sure.
Conclusion
With extraordinary hardware configuration, balancing both
processing power and power consumption, the DS112j is lightweight and having
small form-factor. With easily replaceable 1xHDD bay supporting up to 4TB of
storage, it basically fulfills the requirements of a home or small office user.
However, if you need more than 1 bay for some reason, DS112j is not for you.
But hey, Synology has whole lot of DiskStation NAS devices, with various
configurations for different customer needs. Finally, DS112j proves to be the
best NAS in its segment in almost every criterion.

